Windows Remote Arduino を利用して Arduino 戦車を動かす | Moonmile Solutions Blog
http://www.moonmile.net/blog/archives/7168
では、Windows がオープンソース化している Firmata ライブラリを利用して Arduino に接続したわけですが、Firmata プロトコル自体は公開されているので、どのような言語でも誰でも作れます。
firmata/arduino
https://github.com/firmata/arduino
github の readme を眺めると、.NET 実装もあります。ソースを見ていくと COM 経由で Arduino に USB ケーブルを刺して使うライブラリになっていますが、これをちょっと修正すれば Bluetooth のシリアル通信対応にできますよね。ということで、Bluetooth 2.0 のシリアル通信である RFCOMM を使って書き換えていきます。
Firmata.NET | imagitronics.org
http://www.imagitronics.org/projects/firmatanet/
2 つある中では、Firmata.NET のほうがコードが短かったので、これを利用します。このコードを使って、Android 上から Firmata を通して Arduino を操作できるようにしましょう。確か、ブラウザや Node.js から使うパターンが多いのですが、Xamarin.Android から C# で扱えるとネイティブアプリとして作れるので便利でしょう。ちなみに、コード自体は、短いので Xamarin の Starter 版(無償版)でも動作確認ができました。無償版の場合 128KB 制限なので、そのなかで収まっていると思われます(正確な大きさはわからない)。
RFCOMM 版の Firmata を作る
ざっくりと移植したのが以下です。Android の Bluetooth を使うために、BluetoothAdapter.DefaultAdapter を利用しています。
1 2 3 4 5 6 7 8 9 10 11 12 13 14 15 16 17 18 19 20 21 22 23 24 25 26 27 28 29 30 31 32 33 34 35 36 37 38 39 40 41 42 43 44 45 46 47 48 49 50 51 52 53 54 55 56 57 58 59 60 61 62 63 64 65 66 67 68 69 70 71 72 73 74 75 76 77 78 79 80 81 82 83 84 85 86 87 88 89 90 91 92 93 94 95 96 97 98 99 100 101 102 103 104 105 106 107 108 109 110 111 112 113 114 115 116 117 118 119 120 121 122 123 124 125 126 127 128 129 130 131 132 133 134 135 136 137 138 139 140 141 142 143 144 145 146 147 148 149 150 151 152 153 154 155 156 157 158 159 160 161 162 163 164 165 166 167 168 169 170 171 172 173 174 175 176 177 178 179 180 181 182 183 184 185 186 187 188 189 190 191 192 193 194 195 196 197 198 199 200 201 202 203 204 205 206 207 208 209 210 211 212 213 214 215 216 217 218 219 220 221 222 223 224 225 226 227 228 229 230 231 232 233 234 235 236 237 238 239 240 241 242 243 244 245 246 247 248 249 250 251 252 253 254 255 256 257 258 259 260 261 262 263 264 265 266 267 268 269 270 271 272 273 274 275 276 277 278 279 280 | class Arduino{ public static int INPUT = 0; public static int OUTPUT = 1; public static int LOW = 0; public static int HIGH = 1; private const int MAX_DATA_BYTES = 32; private const int DIGITAL_MESSAGE = 0x90; // send data for a digital port private const int ANALOG_MESSAGE = 0xE0; // send data for an analog pin (or PWM) private const int REPORT_ANALOG = 0xC0; // enable analog input by pin # private const int REPORT_DIGITAL = 0xD0; // enable digital input by port private const int SET_PIN_MODE = 0xF4; // set a pin to INPUT/OUTPUT/PWM/etc private const int REPORT_VERSION = 0xF9; // report firmware version private const int SYSTEM_RESET = 0xFF; // reset from MIDI private const int START_SYSEX = 0xF0; // start a MIDI SysEx message private const int END_SYSEX = 0xF7; // end a MIDI SysEx message // private SerialPort _serialPort; private int delay; private int waitForData = 0; private int executeMultiByteCommand = 0; private int multiByteChannel = 0; private int[] storedInputData = new int[MAX_DATA_BYTES]; private bool parsingSysex; private int sysexBytesRead; private volatile int[] digitalOutputData = { 0, 0, 0, 0, 0, 0, 0, 0, 0, 0, 0, 0, 0, 0, 0, 0 }; private volatile int[] digitalInputData = { 0, 0, 0, 0, 0, 0, 0, 0, 0, 0, 0, 0, 0, 0, 0, 0 }; private volatile int[] analogInputData = { 0, 0, 0, 0, 0, 0, 0, 0, 0, 0, 0, 0, 0, 0, 0, 0 }; private int majorVersion = 0; private int minorVersion = 0; // private Thread readThread = null; private object locker = new object(); /* Guid serviceGuid = Guid.Parse("00001101-0000-1000-8000-00805f9b34fb"); RfcommDeviceService rfcommService; StreamSocket socket; DataWriter writer; DataReader reader; */ BluetoothSocket _socket; /// <summary> /// /// </summary> /// <param name="serialPortName">String specifying the name of the serial port. eg COM4</param> /// <param name="baudRate">The baud rate of the communication. Default 115200</param> /// <param name="autoStart">Determines whether the serial port should be opened automatically. /// use the Open() method to open the connection manually.</param> /// <param name="delay">Time delay that may be required to allow some arduino models /// to reboot after opening a serial connection. The delay will only activate /// when autoStart is true.</param> public Arduino(string serialPortName, Int32 baudRate, bool autoStart, int delay) { /* _serialPort = new SerialPort(serialPortName, baudRate); _serialPort.DataBits = 8; _serialPort.Parity = Parity.None; _serialPort.StopBits = StopBits.One; */ if (autoStart) { this.delay = delay; this.Connect(); this.Open(); } } /// <summary> /// Creates an instance of the Arduino object, based on a user-specified serial port. /// Assumes default values for baud rate (115200) and reboot delay (8 seconds) /// and automatically opens the specified serial connection. /// </summary> /// <param name="serialPortName">String specifying the name of the serial port. eg COM4</param> public Arduino(string serialPortName) : this(serialPortName, 115200, true, 8000) { } /// <summary> /// Creates an instance of the Arduino object, based on user-specified serial port and baud rate. /// Assumes default value for reboot delay (8 seconds). /// and automatically opens the specified serial connection. /// </summary> /// <param name="serialPortName">String specifying the name of the serial port. eg COM4</param> /// <param name="baudRate">Baud rate.</param> public Arduino(string serialPortName, Int32 baudRate) : this(serialPortName, baudRate, true, 8000) { } /// <summary> /// Creates an instance of the Arduino object using default arguments. /// Assumes the arduino is connected as the HIGHEST serial port on the machine, /// default baud rate (115200), and a reboot delay (8 seconds). /// and automatically opens the specified serial connection. /// </summary> public Arduino() : this(Arduino.list().ElementAt(list().Length - 1), 115200, false, 8000) { } public void Connect() { BluetoothAdapter adapter = BluetoothAdapter.DefaultAdapter; if (adapter == null) { throw new Exception("No Bluetooth adapter found."); } if (!adapter.IsEnabled) { throw new Exception("Bluetooth adapter is not enabled."); } BluetoothDevice device = (from bd in adapter.BondedDevices where bd.Name == "HC-06" select bd).FirstOrDefault(); if (device == null) { throw new Exception("Named device not found."); } _socket = device.CreateRfcommSocketToServiceRecord(UUID.FromString("00001101-0000-1000-8000-00805f9b34fb")); _socket.Connect(); return; } /// <summary> /// Opens the serial port connection, should it be required. By default the port is /// opened when the object is first created. /// </summary> public void Open() { // _serialPort.Open(); // Thread.Sleep(delay); byte[] command = new byte[2]; for (int i = 0; i < 6; i++) { command[0] = (byte)(REPORT_ANALOG | i); command[1] = (byte)1; // _serialPort.Write(command, 0, 2); _socket.OutputStream.Write(command, 0, command.Length); } for (int i = 0; i < 2; i++) { command[0] = (byte)(REPORT_DIGITAL | i); command[1] = (byte)1; // _serialPort.Write(command, 0, 2); _socket.OutputStream.Write(command, 0, command.Length); } command = null; /* if (readThread == null) { readThread = new Thread(processInput); readThread.Start(); } */ } /// <summary> /// Closes the serial port. /// </summary> public void Close() { // readThread.Join(500); // readThread = null; // _serialPort.Close(); _socket.Close(); _socket = null; } /// <summary> /// Lists all available serial ports on current system. /// </summary> /// <returns>An array of strings containing all available serial ports.</returns> public static string[] list() { // return SerialPort.GetPortNames(); return new string[] { "HC-06" }; } /// <summary> /// Returns the last known state of the digital pin. /// </summary> /// <param name="pin">The arduino digital input pin.</param> /// <returns>Arduino.HIGH or Arduino.LOW</returns> public int digitalRead(int pin) { return (digitalInputData[pin >> 3] >> (pin & 0x07)) & 0x01; } /// <summary> /// Returns the last known state of the analog pin. /// </summary> /// <param name="pin">The arduino analog input pin.</param> /// <returns>A value representing the analog value between 0 (0V) and 1023 (5V).</returns> public int analogRead(int pin) { return analogInputData[pin]; } /// <summary> /// Sets the mode of the specified pin (INPUT or OUTPUT). /// </summary> /// <param name="pin">The arduino pin.</param> /// <param name="mode">Mode Arduino.INPUT or Arduino.OUTPUT.</param> public void pinMode(int pin, int mode) { byte[] message = new byte[3]; message[0] = (byte)(SET_PIN_MODE); message[1] = (byte)(pin); message[2] = (byte)(mode); // _serialPort.Write(message, 0, 3); _socket.OutputStream.Write(message, 0, message.Length); message = null; } /// <summary> /// Write to a digital pin that has been toggled to output mode with pinMode() method. /// </summary> /// <param name="pin">The digital pin to write to.</param> /// <param name="value">Value either Arduino.LOW or Arduino.HIGH.</param> public void digitalWrite(int pin, int value) { int portNumber = (pin >> 3) & 0x0F; byte[] message = new byte[3]; if (value == 0) digitalOutputData[portNumber] &= ~(1 << (pin & 0x07)); else digitalOutputData[portNumber] |= (1 << (pin & 0x07)); message[0] = (byte)(DIGITAL_MESSAGE | portNumber); message[1] = (byte)(digitalOutputData[portNumber] & 0x7F); message[2] = (byte)(digitalOutputData[portNumber] >> 7); // _serialPort.Write(message, 0, 3); _socket.OutputStream.Write(message, 0, message.Length); } /// <summary> /// Write to an analog pin using Pulse-width modulation (PWM). /// </summary> /// <param name="pin">Analog output pin.</param> /// <param name="value">PWM frequency from 0 (always off) to 255 (always on).</param> public void analogWrite(int pin, int value) { byte[] message = new byte[3]; message[0] = (byte)(ANALOG_MESSAGE | (pin & 0x0F)); message[1] = (byte)(value & 0x7F); message[2] = (byte)(value >> 7); // _serialPort.Write(message, 0, 3); _socket.OutputStream.Write(message, 0, message.Length); } private void setDigitalInputs(int portNumber, int portData) { digitalInputData[portNumber] = portData; } private void setAnalogInput(int pin, int value) { analogInputData[pin] = value; } private void setVersion(int majorVersion, int minorVersion) { this.majorVersion = majorVersion; this.minorVersion = minorVersion; } /* private int available() { return _serialPort.BytesToRead; } */} // End Arduino class |
接続あたりは、
Android から Bluetooth+RFCOMM を利用してモーター制御をする | Moonmile Solutions Blog
http://www.moonmile.net/blog/archives/6826
と同じように書いています。独自に RFCOMM を使った場合は自前で Android/Arduino のプロトコルを作らなければいけませんが(とはいえ、自分の場合は 8 バイト固定にしてあるの簡単)、Firmata プロトコルを使うと、GPIO 等をそのまま使う分には手軽です。
バイナリ送信をしているとこもそのまま移植。今回はテスト的なものなので、Android の受信側は省略しました。もうちょっと整理して、そのうち github へ。
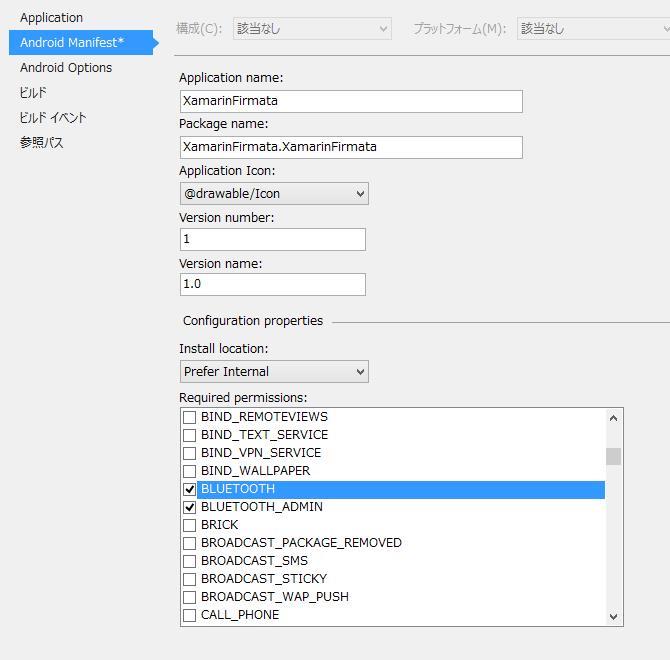
マニフェストを設定する
Bluetooth を扱うので、パーミッションを設定しておきます。
たぶん、”BLUETOOTH” だけチェックすれば ok です。
UI と MainActivity
こんな画面を作っておきます。
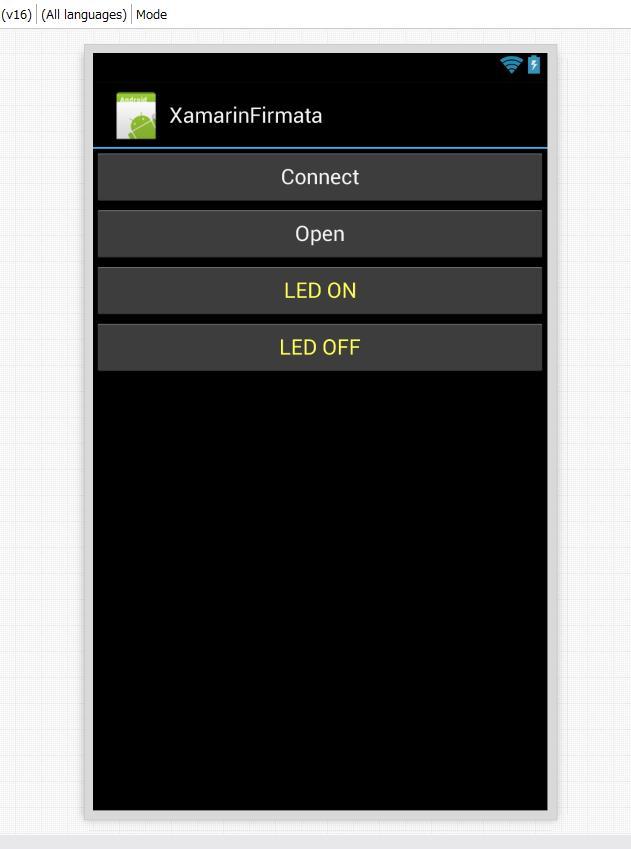
5ピンに LED をつけるので、pinMode などを設定します。
1 2 3 4 5 6 7 8 9 10 11 12 13 14 15 16 17 18 19 20 21 22 23 24 25 26 27 28 29 30 31 32 33 34 35 36 37 | public class MainActivity : Activity{ Arduino arduino; protected override void OnCreate(Bundle bundle) { base.OnCreate(bundle); // Set our view from the "main" layout resource SetContentView(Resource.Layout.Main); // Get our button from the layout resource, // and attach an event to it arduino = new Arduino(); FindViewById<Button>(Resource.Id.buttonConnect).Click += (s, e) => { arduino.Connect(); FindViewById<Button>(Resource.Id.buttonConnect).Text = "connected."; }; FindViewById<Button>(Resource.Id.buttonOpen).Click += (s, e) => { arduino.Open(); FindViewById<Button>(Resource.Id.buttonOpen).Text = "Firmata opend"; arduino.pinMode(5, Arduino.OUTPUT); arduino.digitalWrite(5, Arduino.LOW); }; FindViewById<Button>(Resource.Id.buttonLEDon).Click += OnClickLedOn; FindViewById<Button>(Resource.Id.buttonLEDoff).Click += OnClickLedOff; } void OnClickLedOn(object sender, EventArgs e) { arduino.digitalWrite(5, Arduino.HIGH); } void OnClickLedOff(object sender, EventArgs e) { arduino.digitalWrite(5, Arduino.LOW); }} |
Connect と Open は同時にやってもいいと思います。RFCOMM へのアクセスを Sync のほうの非同期関数を使えばよかったのですが、ひとまず同期的に作っています。まあ、受信回り(温度や湿度データとか)をきちんと作って、await/async を使えば結構すっきりするハズです。
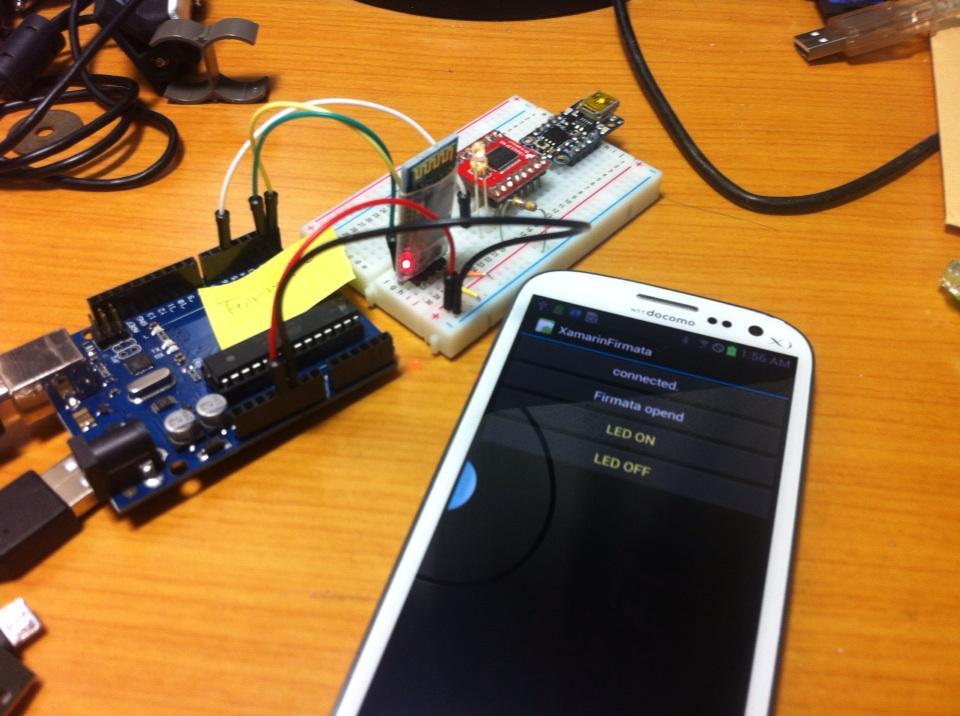
実行してみる
ビルドをして実機で実行してみます。うちの Android は 4.1.2 という古いタイプなのですが正常に動作しました。Bluetooth 経由なので、アクセスポイントとかが必要ないので戸外でも使えますよね。まあ、戸外で使って、どうということはないのですが。
これはこれで整理して、後で Arduino 戦車も動かせるように組み直しいきましょう。あと、適当な距離センサーや加速度センサーを付けて、値をとれるようにいておきます。