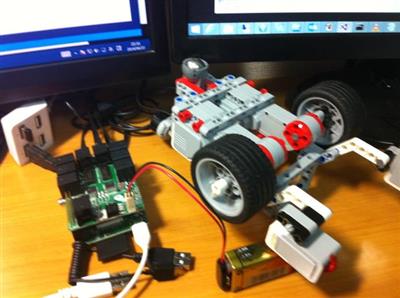
F# に限らないのですが、試しにモーター制御の部分だけ .NET 版の BrickPi を作りました。
https://github.com/moonmile/BrickPiNet
– BrickPi.h と brickpinet.c で .NET に公開可能なインターフェースを作る
– BrickPi.cs と BPi.cs で .NET で包む
– sample.cs、sampleF.fs のように C#/F# で制御する
というパターンです。BrickPi_Python などを見ると、それぞれの言語でシリアルポートに直接アクセスしているのですが、C# からポートアクセスは面倒だし、BlickPi.h 自体で十分なインターフェースになっているのでこれをそのまま使います。BrickPi.h 自体は C言語で掛かれているので、そのまま shared で公開して、これを BrickPi.cs で DllImport するというスタイルになっています。
sample.cs と sampleF.fs の場合は、ほとんど生の BrickPi クラスを使っているので他のプログラム言語との対応が取りやすくなっています。が、そのままでオブジェクト指向的に扱いにくいので、BPi クラスを作ってオブジェクト化しています。複数のモーター制御のところで MVVM パターンを使っているのはお試しです。BrickPi の場合は、ポート呼び出しの後に戻りがないので、INotifyPropertyChanged と相性がよいかもしれません。次はセンサーから入って来る操作なので、event 的に作るか、reactive 的に作るか、といったところです。
以下、ざっとファイルの解説を。
■Makefile
Raspberry Pi 上でビルドする必要があるので、Makefile を作っています。先のブログにも書きましたが、RasPi の現状のレポジトリにある mono では F# 3.1 が動かないので、mono のビルドが必須になります。それだと相当大変なので、単に試したい方は、F# のほう(fshaprcのところ)は削除して、apt-get install mono-complete の後、ビルドを試してみてください。
1 2 3 4 5 6 7 8 9 10 11 12 13 14 15 16 17 18 19 20 21 22 23 | all: sample.exe sampleF.exe libbrickpinet.so sampleCs.exe sampleF2.exesample.exe: libbrickpinet.so BrickPi.dll sample.cs gmcs /out:sample.exe -sdk:4.5 /r:BrickPi.dll sample.cs sampleCs.exe: libbrickpinet.so BrickPi.dll sampleCs.cs gmcs /out:sampleCs.exe -sdk:4.5 /r:BrickPi.dll sampleCs.cs sampleF.exe: libbrickpinet.so BrickPi.dll fsharpc /out:sampleF.exe /r:BrickPi.dll sampleF.fs sampleF2.exe: libbrickpinet.so BrickPi.dll fsharpc /out:sampleF.exe /r:BrickPi.dll sampleF2.fs libbrickpinet.so: brickpinet.o gcc -fPIC -shared -o libbrickpinet.so brickpinet.c -lrt -lm -L/usr/local/lib -lwiringPiBrickPi.dll: BrickPi.cs gmcs /target:library /out:BrickPi.dll -sdk:4.5 BindableBase.cs BrickPi.cs BPi.cs |
■brickpinet.c
libbrickpinet.so で BrickPi API を公開させています。BrickPi 構造体へのアクセスがいちいち書いてるのは、C# から C言語の構造体の手間を省くためです。box してもよいのですが、Mono の場合 box は使えるのか?とか調べるのが面倒だったので。
1 2 3 4 5 6 7 8 9 10 11 12 13 14 15 16 17 18 19 20 21 22 23 24 25 26 27 28 | /* * BrickPi Interface for .NET */#include "tick.h"#include "BrickPi.h"void SetTimeout(int time) { BrickPi.Timeout = time;}int GetTimeout() { return BrickPi.Timeout;}/* Motors*/void SetMotorSpeed(int motor, int speed) { BrickPi.MotorSpeed[motor] = speed;}int GetMotorSpeed(int motor) { return BrickPi.MotorSpeed[motor];}void SetMotorEnable(int motor, int b) { BrickPi.MotorEnable[motor] = b == 0 ? 0 : 1;}int GetMotorEnable(int motor) { return BrickPi.MotorEnable[motor] == 0 ? 0 : 1;}... |
■BrickPi.cs
単純な.NET版のラッパークラスです。他のプログラム言語との対応がとりやすい形にします。
1 2 3 4 5 6 7 8 9 10 11 12 13 14 15 16 17 18 19 20 21 22 23 24 25 26 27 28 29 | namespace BrickPiNet{ public class BrickPi { public const int PORT_A = 0; public const int PORT_B = 1; public const int PORT_C = 2; public const int PORT_D = 3; public const int PORT_1 = 0; public const int PORT_2 = 1; public const int PORT_3 = 2; public const int PORT_4 = 3; public const int MASK_D0_M = 0x01; public const int MASK_D1_M = 0x02; public const int MASK_9V = 0x04; public const int MASK_D0_S = 0x08; public const int MASK_D1_S = 0x10;~~~ [DllImport("libbrickpinet", EntryPoint = "BrickPiSetup")] public static extern int Setup(); [DllImport("libbrickpinet", EntryPoint = "BrickPiSetupSensors")] public static extern int SetupSensors(); [DllImport("libbrickpinet", EntryPoint = "BrickPiUpdateValues")] public static extern void UpdateValues(); [DllImport("libbrickpinet", EntryPoint = "BrickPiSetTimeout")] public static extern void InitTimeout(); |
■BPi.cs
いちいち関数を呼び出すのは面倒なので、オブジェクト指向っぽく直したのが BPi クラスです。
値を設定した後に、BrickPi.UpdateValues() を呼び出さなくてもよいようにしてあります。ただ、プロパティの変更にセンシティブなのは MVVM の欠点で、このあたりは別なところで回避しようかなと思ってます。例えば、2つのモーターの向きを同時に変える、というようなパターンがそれに相当します。
1 2 3 4 5 6 7 8 9 10 11 12 13 14 15 16 17 18 19 20 21 22 23 24 25 26 27 28 29 30 31 32 33 34 35 36 37 38 39 40 41 42 43 44 45 46 47 48 49 50 51 52 53 54 55 56 57 58 59 60 61 62 63 64 65 66 67 68 69 70 71 72 73 74 75 76 77 78 79 80 81 82 83 84 85 86 87 88 89 90 91 92 93 94 95 96 97 98 99 100 101 102 103 104 105 106 107 108 109 | public class BPi{ public ObservableCollection<BPiMotor> Motors; public bool AutoUpdate { get; set; } private int _timeout = 3000; public int Timeout { get { return _timeout; } set { if (_timeout != value) { _timeout = value; BrickPi.SetTimeout(value); BrickPi.InitTimeout(); } } } /// <summary> /// Constructor /// </summary> public BPi() { this.Motors = new ObservableCollection<BPiMotor>(); this.Motors.CollectionChanged += Motors_CollectionChanged; this.AutoUpdate = false; } public void Setup() { int res = BrickPi.Setup(); if (res != 0) { Console.WriteLine(""); throw new Exception(string.Format("Error: BrickPi.Setup: {0}", res )); } } void Motors_CollectionChanged(object sender, System.Collections.Specialized.NotifyCollectionChangedEventArgs e) { // var m = sender as BPiMotor; switch ( e.Action ) { case NotifyCollectionChangedAction.Add: foreach (BPiMotor it in e.NewItems) { it.PropertyChanged += it_PropertyChanged; BrickPi.SetMotorEnable(it.Port, it.Enabled); } break; case NotifyCollectionChangedAction.Remove: foreach (BPiMotor it in e.OldItems) { it.PropertyChanged -= it_PropertyChanged; BrickPi.SetMotorEnable(it.Port, false); } break; case NotifyCollectionChangedAction.Reset: break; } int res = BrickPi.SetupSensors(); if (res != 0) { Console.WriteLine(""); throw new Exception(string.Format("Error: BrickPi.SetupSensors: {0}", res)); } } void it_PropertyChanged(object sender, System.ComponentModel.PropertyChangedEventArgs e) { if (this.AutoUpdate == true) Update(); } /// <summary> /// call UpdateValues /// </summary> public void Update() { BrickPi.UpdateValues(); System.Threading.Thread.Sleep(10); }}public class BPiMotor : BindableBase{ public int Port { get; set; } private bool _enabled = false; public bool Enabled { get { return _enabled; } set { BrickPi.SetMotorEnable(this.Port, value); this.SetProperty(ref this._enabled, value); } } private int _speed = 0; public int Speed { get { return _speed; } set { BrickPi.SetMotorSpeed(this.Port, value); this.SetProperty(ref this._speed, value ); } }} |
実際に制御するサンプルコードです。
■sampleCs.cs
設定部分がちょっとオブジェクト指向っぽい感じですね。最終的には、Xamarin.iOS/Android を使って、iPad から制御できるようにします。通信部分は、.NET で簡易HTTPサーバー作ってRESTでやり取りするという感じです。
1 2 3 4 5 6 7 8 9 10 11 12 13 14 15 16 17 18 19 20 21 22 23 24 25 26 27 28 29 30 31 32 33 34 35 36 37 38 39 40 41 42 43 44 45 46 47 48 49 50 51 52 53 54 55 | class Program2{ void main() { int speed = 200; var bpi = new BPi(); // initialize bpi.Setup(); bpi.AutoUpdate = true; var motor1 = new BPiMotor() { Port = BrickPi.PORT_B, Enabled = true }; var motor2 = new BPiMotor() { Port = BrickPi.PORT_C, Enabled = true }; bpi.Motors.Add(motor1); bpi.Motors.Add(motor2); bpi.Timeout = 3000; Console.WriteLine("start"); bool loop = true; while (loop) { var k = Console.ReadKey(); switch (k.Key) { case ConsoleKey.W: motor1.Speed = speed; motor2.Speed = speed; break; case ConsoleKey.A: motor1.Speed = speed; motor2.Speed = -speed; break; case ConsoleKey.D: motor1.Speed = -speed; motor2.Speed = speed; break; case ConsoleKey.S: motor1.Speed = -speed; motor2.Speed = -speed; break; case ConsoleKey.X: motor1.Speed = 0; motor2.Speed = 0; break; case ConsoleKey.Q: loop = false; break; } // bpi.Update(); } } static void Main(string[] args) { var pro = new Program2(); pro.main(); }} |
■sampleF2.fs
F# の場合も C# とほぼ同じですが、括弧がない分だけ若干短く書けます。これも HTTP 経由で制御できるようにする予定です。
1 2 3 4 5 6 7 8 9 10 11 12 13 14 15 16 17 18 19 20 21 22 23 24 25 26 27 28 29 30 31 32 33 34 35 36 37 | module sampleF2open Systemopen BrickPiNet let speed = 200// mainlet bpi = new BPi()bpi.Setup()bpi.AutoUpdate <- truelet motor1 = new BPiMotor( Port = BrickPi.PORT_B, Enabled = true )let motor2 = new BPiMotor( Port = BrickPi.PORT_B, Enabled = true )bpi.Motors.Add(motor1)bpi.Motors.Add(motor2)bpi.Timeout <- 3000 Console.WriteLine("start")let mutable loop = truewhile loop do let key = Console.ReadKey() match key.Key with | ConsoleKey.W -> motor1.Speed <- speed motor2.Speed <- speed | ConsoleKey.A -> motor1.Speed <- speed motor2.Speed <- -speed | ConsoleKey.D -> motor1.Speed <- -speed motor2.Speed <- speed | ConsoleKey.S -> motor1.Speed <- -speed motor2.Speed <- -speed | ConsoleKey.X -> motor1.Speed <- 0 motor2.Speed <- 0 | ConsoleKey.Q -> loop <- false | _ -> () |
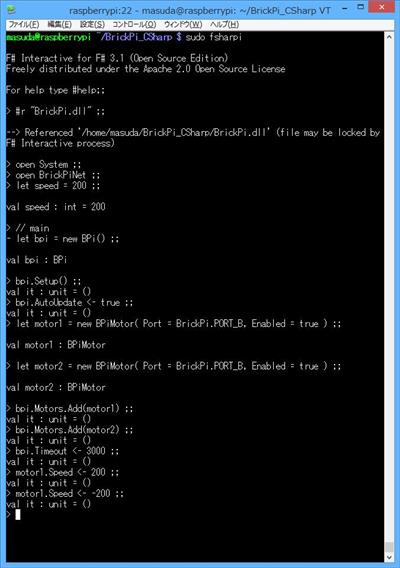
F# の場合、面白いのはインタープリタ(fsharpi)でも動くことです。Raspberry Pi 上のターミナルで、fsharpi でインタープリタを起動した後で、以下を一気に通します。シリアルポートアクセスのため sudo で root 権限で動かしてください。
1 2 3 4 5 6 7 8 9 10 11 12 13 | #r "BrickPi.dll" ;;open System ;;open BrickPiNet ;;let speed = 200 ;;// mainlet bpi = new BPi() ;;bpi.Setup() ;;bpi.AutoUpdate <- true ;;let motor1 = new BPiMotor( Port = BrickPi.PORT_B, Enabled = true ) ;;let motor2 = new BPiMotor( Port = BrickPi.PORT_B, Enabled = true ) ;;bpi.Motors.Add(motor1) ;;bpi.Motors.Add(motor2) ;;bpi.Timeout <- 3000 ;; |
その後、
1 | motor1.Speed <- 200 ;; |
のように F# のコードを書くとそのまま車輪が動き出します。このあたりの流れは F# インタープリタならではのところです。制御コマンドっぽい形で動かせるので、テストとか試行錯誤のときに便利そうです。


