CakePHPのXMLレスポンスをWPFで一覧表示する | Moonmile Solutions Blog
http://www.moonmile.net/blog/archives/5370
の Windows ストアアプリ版も作ってみます。
本当はListViewを使いたいところだけど、手始めに GridView を使うところから。もっと、WPFのListViewのようなダサいデザインを手軽に作れればいいのですが。どうもうまくいかない。
■データモデルを作る
WPFで作ったソースをそのまま流用しますが、一か所だけ違います。リフレクションでプロパティを取ってくるところで、拡張メソッドの GetTypeInfo を使います。なんで、こんな風にしたのか不明なのですが。
1 2 3 4 5 6 7 8 9 10 11 12 13 14 15 16 17 18 19 20 21 22 23 24 | using System.Reflection;public class IModel{ public void FormXml(XElement el) { // WinRTの場合 var pis = this.GetType().GetTypeInfo().DeclaredProperties; foreach (var pi in pis) { var vv = el.Descendants(pi.Name).FirstOrDefault(); if (vv != null) { var v = vv.Value; if (pi.PropertyType == typeof(int)) pi.SetValue(this, int.Parse(v)); else if (pi.PropertyType == typeof(double)) pi.SetValue(this, double.Parse(v)); else if (pi.PropertyType == typeof(string)) pi.SetValue(this, v); } } }} |
POJO なクラスはそのままで。
■グリッドビューを作る
VS2013 でグリッドのテンプレートを作ると、きれいな GridView のテンプレートを吐き出してくれるけどカスタムしにくいので、最小限のコードだけにします。
1 2 3 4 5 6 7 | <GridView x:Name="itemGridView" ItemsSource="{Binding Items}" ItemTemplate="{StaticResource StoreTemplate}" Margin="13,13,10,10" Grid.Row="1" SelectionChanged="itemGridView_SelectionChanged"></GridView> |
データのバインドは「ItemsSource=”{Binding Items}”」なところで。このあたりは WPF と同じ。GirdView に表示するアイテムのテンプレートは、「ItemTemplate=”{StaticResource StoreTemplate}”」で指定してます。既存のデータテンプレートを使うと、バインド名が Title や Subtitle に固定になっているので、ここはカスタムで。StaticResource せずとも、GridView.ItemTemplate を使って以下のようにも書けます。
1 2 3 4 5 6 7 8 9 10 11 12 13 14 | <GridView x:Name="itemGridView" ItemsSource="{Binding Items}" Margin="13,13,10,10" Grid.Row="1" SelectionChanged="itemGridView_SelectionChanged"> <GridView.ItemTemplate> <DataTemplate> <Grid Width="200" Height="200"> <TextBlock Text="{Binding ID}" FontSize="20" Margin="10,10,10,150" /> <TextBlock Text="{Binding Name}" FontSize="20" Margin="10,50,10,97" /> </Grid> </DataTemplate> </GridView.ItemTemplate></GridView> |
1回だけしか使わない場合はこれで十分ですよね。そもそも、StaticResource って、その xaml 内に限るからあまりそこに書く理由はあまり意味ないかも、と思ってたり。
ページリソースに記述する場合はこんな感じで「StoreTemplate」のように名前を付けておきます。デザイン用のデータを読み込んでちまちま修正するパターンもできるので、これはこれで便利だし。他のプロジェクトからコピペする場合も便利。
1 2 3 4 5 6 7 8 | <Page.Resources> <DataTemplate x:Key="StoreTemplate"> <Grid Width="200" Height="200"> <TextBlock Text="{Binding ID}" FontSize="20" Margin="10,10,10,150" /> <TextBlock Text="{Binding Name}" FontSize="20" Margin="10,50,10,97" /> </Grid> </DataTemplate></Page.Resources> |
デザイン用のデータは、VS2013 から JSON 型式で読み込めるようになったのですが、何故か日本語が通りません。UTF-8 にしてもダメなので、なんか XAML デザイナのほうで変なことをやっている気がします。英語(ASCII文字)だけにすると通ります。
■プロパティビューっぽいもの
VS2013が作ってくれるデザインテンプレートでは、アイテムをクリックすると詳細画面に遷移しますが、ここは WPF と同じように同一の画面に表示させます。いちいち画面遷移するのも面倒だし(特に戻るのが面倒)、でかい画面を切り替えるよりも、画面を自前で分割するほうがいいよってことで。
1 2 3 4 5 6 7 8 9 10 11 12 | <TextBox Text="{Binding Item.ID}" Grid.Column="1" HorizontalAlignment="Left" Height="23" Margin="10,13,0,0" Grid.Row="1" TextWrapping="Wrap" VerticalAlignment="Top" Width="280"/><TextBox Text="{Binding Item.Name}" Grid.Column="1" HorizontalAlignment="Left" Height="23" Margin="10,50,0,0" Grid.Row="1" TextWrapping="Wrap" VerticalAlignment="Top" Width="280"/><TextBox Text="{Binding Item.Sellingcompany.Name}" Grid.Column="1" HorizontalAlignment="Left" Height="23" Margin="10,87,0,0" Grid.Row="1" TextWrapping="Wrap" VerticalAlignment="Top" Width="280"/><TextBox Text="{Binding Item.Areagroup.Name}" Grid.Column="1" HorizontalAlignment="Left" Height="23" Margin="10,124,0,0" Grid.Row="1" TextWrapping="Wrap" VerticalAlignment="Top" Width="280"/> |
バインドは、Item の下にプロパティをつける形にしておきます。この構造は、先のデータモデルと合わせておきます。当然名前も一緒にしないとダメ。
■バインド用のモデルを作る
ここは WPF と同じ。
1 2 3 4 5 6 7 8 9 10 11 12 13 14 15 16 | public class BindModel : BindableBase{ private ObservableCollection<Model.Store> _Items; public ObservableCollection<Model.Store> Items { get { return _Items; } set { this.SetProperty(ref this._Items, value); } } private Model.Store _Item; public Model.Store Item { get { return _Item; } set { this.SetProperty(ref this._Item, value); } }} |
■DataContextに設定する
DataContext に設定する方法も同じ。ストアアプリでは、DefaultViewModel がある訳ですが、実質同じことをやるので、どちらかを使えば OK です。
[win8] DefaultViewModel と DataContext は同時に使えない | Moonmile Solutions Blog
http://www.moonmile.net/blog/archives/3873
に書いた通り「バインディングするところがアレ」なので、DataContext で十分かなと思ったりします。コードレベルで WPF との共有も考えると、業務コード的にはどっちかに統一しておいたほうがよいかも。覚えることが少なくなるし。
1 2 3 4 5 6 7 8 9 10 11 12 13 14 15 16 17 18 19 20 21 22 23 24 25 26 27 28 29 30 31 32 33 | public sealed partial class MainPage : Page{ public MainPage() { this.InitializeComponent(); // モデルをバインドする _model = new BindModel(); this.DataContext = _model; } private BindModel _model; /// <summary> /// 一覧を取得 /// </summary> /// <param name="sender"></param> /// <param name="e"></param> private async void Button_Click(object sender, RoutedEventArgs e) { var lst = await new Api.ApiStore().Read(); _model.Items = new ObservableCollection<Model.Store>(lst); } /// <summary> /// アイテムをクリックしたとき /// </summary> /// <param name="sender"></param> /// <param name="e"></param> private void itemGridView_SelectionChanged(object sender, SelectionChangedEventArgs e) { var item = e.AddedItems[0] as Model.Store; _model.Item = item; }} |
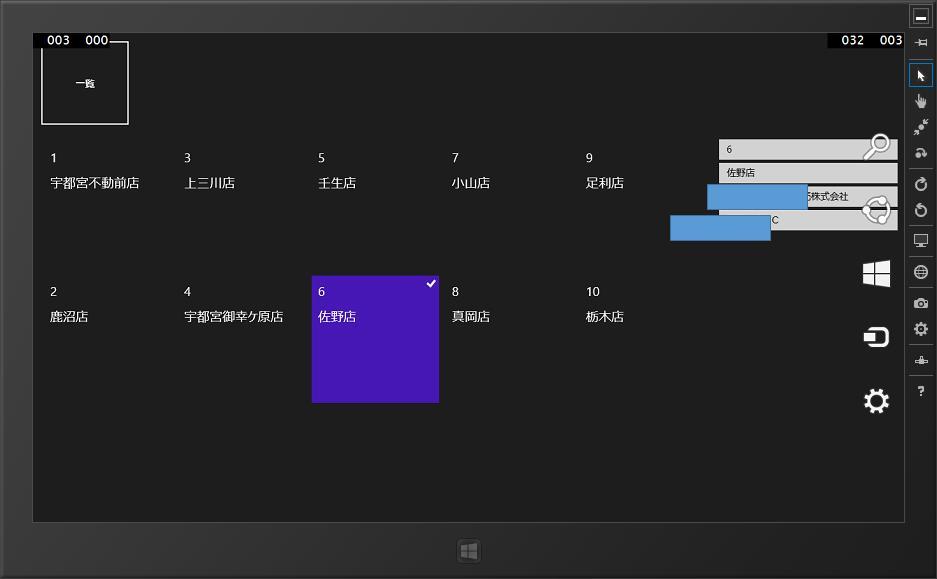
これで API 呼び出しをして、GridView のアイテムをちまちまとクリック(タブレットの場合はタップ)すると、詳細情報が右のプロパティ一覧に表示されます。
ちなみに、WPFでテキストボックスにバインドをすると初期値が TwoWay(双方向)になっていますが、ストアアプリの場合は OneWay(表示のみ)です。あとストアアプリの場合、それぞれのプロパティに INotifyPropertyChanged をつけないと、TwoWay にならないのが面倒かなと。このあたり VS2012 のグリッドのサンプルにはあったのだけど、VS2013 のグリッドのサンプルにはないんですよね。
GridView の場合は横スクロールなので、お次は ListView を使って縦スクロール(WPFのリスト表示と同じパターン)で作ってみます。