
ちょっとメモ書き的に。
metro アプリでは、XAML を使ってデータバインディング、ってのが主流?なのですが、プロジェクトテンプレートを見ると、GridView とか FlipView とかの「コレクション」に対するバインディングは多いのですが、ひとつのアイテムだけをバインディング、っていう簡単な手法が示されていない…んですよね。たぶん。見つけ方が悪いだけなのかな?
ここのところ、MVVM パターンのほうはさておき、実装的にどうすれば「教えやすいのか?」ってのを考えると、
コードを使ってちまちまとコントロールの Text プロパティやらに設定していく、ってのが一番安全な方法だと思うわけです。で、まあ、それでも良いのですが、せっかく MVVM パターンのテンプレートを使っているわけだし、それなりのバインディング用のクラス「BindableBase」があるわけで、これを活用しようかな、と悩んでいたわけですが。
■モデルクラスを作る
1 2 3 4 5 6 7 8 9 10 11 12 13 14 15 16 17 18 19 20 21 22 23 24 25 26 27 28 | namespace SampleDataBinding.DataModel{ class MainItemSource : BindableBase { private int _id; public int ID { get { return this._id ; } set { this.SetProperty(ref this._id, value); } } private string _name ; public string Name { get { return this._name; } set { this.SetProperty(ref this._name, value); } } private string _address ; public string Address { get { return this._address; } set { this.SetProperty(ref this._address, value); } } public override string ToString() { return string.Format("{0}:{1}", this._id, _name); } }} |
ひとつの Model がひとつの View に対応するという一番単純な例です。この単純さだと、Text プロパティにちまちまでもいいのです
「基本ページ」などでインポートされる、BindableBase クラスを継承してモデルクラスを作ります。コレクションに利用するのではなくて、が、バインディングの練習がてらに。
■リソース経由で参照させるパターン
以前から使われているリソースから直接渡すパターンです…と思います。
「xmlns:model=”using:SampleDataBinding.DataModel”」という名前空間をあらかじめ指定しておいて、スタティックリソースに「DataSource」という名前をつけます。MainItemSource クラスを直接参照できるので、便利といえば便利なのですが。
1 2 3 4 5 | <Page.Resources> <!-- TODO: Delete this line if the key AppName is declared in App.xaml --> <x:String x:Key="AppName">My Application</x:String> <model:MainItemSource x:Key="DataSource" /></Page.Resources> |
下のように、Source=”{StaticResource DataSource}” が必要になります。デフォルトのデータソースを指定できたような気もするのですが、ちょっと忘れてしまいました
1 2 3 4 5 6 7 8 9 | <TextBlock x:Name="labelID" Text="{Binding ID, Source={StaticResource DataSource}}" HorizontalAlignment="Left" Margin="272,73,0,0" Grid.Row="1" TextWrapping="Wrap" VerticalAlignment="Top" FontSize="24" Height="29"> </TextBlock> <TextBlock x:Name="labelName" Text="{Binding Name, Source={StaticResource DataSource}}" HorizontalAlignment="Left" Margin="272,123,0,0" Grid.Row="1" TextWrapping="Wrap" VerticalAlignment="Top" FontSize="24"/> |
ここで問題なのは、MainItemSource のオブジェクトってどこでで作成されているんだろうか?というのと、いったい、ID とか Name とかはどこで設定すればよいのか? ってことなのです。業務的には、よくわからないから、いきおい MainItemSource クラスを変更して static であらかじめ初期値を入れておいたり、ってことになるわけですが、それはちょっとあんまりなコードですよね。
…と、ここまで書いて思い出しました。View に DataContext というプロパティがありました。
XAML のほうを、次のようにバインディングする ID や Name プロパティ名を指定しておきます。
1 2 3 4 5 6 7 8 9 | <TextBlock x:Name="labelID" Text="{Binding ID}" HorizontalAlignment="Left" Margin="272,73,0,0" Grid.Row="1" TextWrapping="Wrap" VerticalAlignment="Top" FontSize="24" Height="29"> </TextBlock> <TextBlock x:Name="labelName" Text="{Binding Name}" HorizontalAlignment="Left" Margin="272,123,0,0" Grid.Row="1" TextWrapping="Wrap" VerticalAlignment="Top" FontSize="24"/> |
でもって、コードのほうで
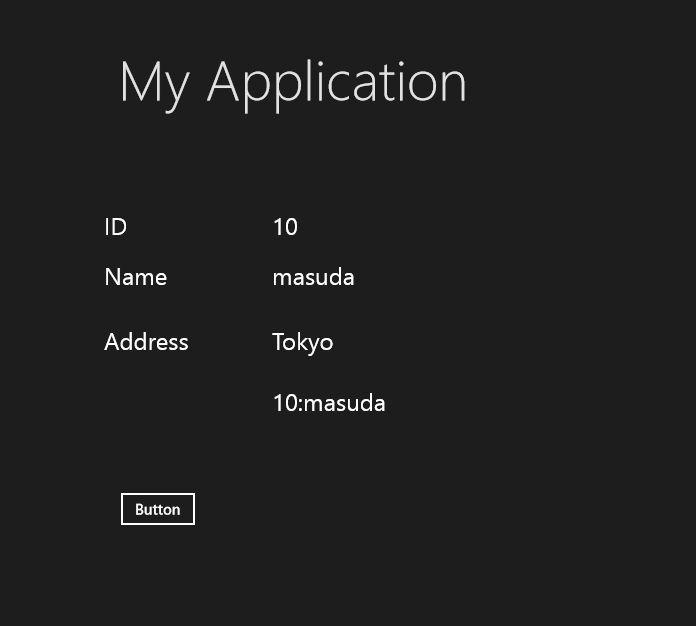
1 2 3 4 5 6 7 8 9 10 | protected override void LoadState(Object navigationParameter, Dictionary<String, Object> pageState){ var item = new MainItemSource() { ID = 10, Name = "masuda", Address = "Tokyo" }; this.DataContext = item;} |
という形で MainItemSource オブジェクトを設定しておけばよいわけです。なるほど、これで十分動きます。
■DefaultViewModel を使う
そんなわけで、もうひとつの方法を。
XAML をもういちど見ていくと、
1 2 3 4 5 | <common:LayoutAwarePage x:Name="pageRoot" x:Class="SampleDataBinding.BasicPage1" DataContext="{Binding DefaultViewModel, RelativeSource={RelativeSource Self}}" xmlns="http://schemas.microsoft.com/winfx/2006/xaml/presentation" |
DataContext なところがあります。いくつか解説もあるのですが、要するに PHP 風や、ASP.NET の ViewState 風に画面のほうにデータを引き渡せる手段です。
Windowsストアアプリにおける グリッドアプリケーションについて(1) – 荒井省三のBlog – Site Home – MSDN Blogs
http://blogs.msdn.com/b/shozoa/archive/2012/10/18/about-grid-application-1-on-windows-store-application.aspx
下記のように、DefaultViewModel[“Item”] を使って「Item」という名前をつけておくと、
1 2 3 4 5 6 7 8 9 10 | protected override void LoadState(Object navigationParameter, Dictionary pageState){ var item = new MainItemSource() { ID = 10, Name = "masuda", Address = "Tokyo" }; this.DefaultViewModel["Item"] = item;} |
こんな風に「Item.ID」とか「Item.Name」とかで MainItemSource オブジェクトの中身が参照できます。
1 2 3 4 5 6 7 8 9 | <TextBlock x:Name="labelID" Text="{Binding Item.ID}" HorizontalAlignment="Left" Margin="272,73,0,0" Grid.Row="1" TextWrapping="Wrap" VerticalAlignment="Top" FontSize="24" Height="29"></TextBlock><TextBlock x:Name="labelName" Text="{Binding Item.Name}" HorizontalAlignment="Left" Margin="272,123,0,0" Grid.Row="1" TextWrapping="Wrap" VerticalAlignment="Top" FontSize="24"/> |
なるほど、こっちのほうがわかりやすい気がします。
ちなみに、ボタンを配置して、
1 2 3 4 | private void Button_Click_1(object sender, RoutedEventArgs e){ _item.Name = "masuda tomoaki";} |
のように、Name プロパティの値を変更すると、画面の表示も変わります。MainItemSource クラスの SetProperty が効いているということですね。
そんなわけで、DefaultViewModel を使うほうが、直感的でわかりやすいかなと。まあ、バインディング自体を XAML に記述するところがアレですが、ひとまずこれで。


よく見ると「{Binding DefaultViewModel」な書き方で、「DefaultViewModel」という名前を付けているので、別の名前でもいいんじゃないんですかね?
自前のコントロールとかビューとかを作って、コンポーネント化するときに他の Binding と名前がかぶらないほうがいいので、名前は変えられたほうがいいし。ちょっと後で試してみる。