前回、Trac に XML-RPC 経由でチケットを投稿する | Moonmile Solutions Blog で、コマンドライン版ができたので、これを windows アプリケーションから作ります。
通常、Unix/Linux の場合には、コマンド呼出をアプリケーションの内部に持って、パイプでつなげるという手法を取ります。windows アプリの場合でも、コマンドラインツールに GUI をくっ付ける場合は、そうします。
また、ライブラリとして切り出すことも可能なのですが…実は、.NET の場合には、直接コマンドラインツールを参照設定することで、ツール内にあるクラス(今回は、TracTools クラス)を使えます。クラスライブラリは DLL に限らず、普通の exe ファイルでも使えるのです…という例ですね。
今までは、COM で作ったり、DLL で関数を共通化したりという小細工が必要(設計段階で考えなくちゃいけなかったという意味で)になるのですが、.NET の場合は、exe を直接クラスライブラリとして扱えるので、適当なクラス分けさえしてあれば、windows アプリケーションとして動作させるのも簡単なのです。
# まぁ、コマンドラインツールのほうで、適度にクラス化が必要なわけですが。そのあたりが、UIDD(User Interface Driven Development)に繋がります。
windows アプリのコードは以下のようにさっくりと、
1 2 3 4 5 6 7 8 9 10 11 12 13 14 15 16 17 18 19 20 21 22 23 24 25 26 27 28 29 30 31 32 33 34 35 36 37 38 39 40 41 42 43 44 45 46 47 48 49 50 51 52 53 54 55 56 57 58 59 60 61 62 63 64 65 66 67 68 69 70 71 72 73 74 75 76 77 78 79 80 81 82 83 84 85 86 87 88 89 90 91 92 93 94 95 96 97 98 99 100 101 102 103 104 105 106 107 108 109 110 111 112 113 114 115 116 117 118 119 120 121 122 123 124 125 126 127 128 | namespace TracWin{ public partial class Form1 : Form { public Form1() { InitializeComponent(); } private void Form1_Load(object sender, EventArgs e) { _trac.Setting.Url = "http://localhost:8000/trac/gokui-ios5/login/rpc"; _trac.Setting.UserName = "masuda"; _trac.Setting.Password = "masuda"; } private string _Repoter = "masuda"; private TracTools _trac = new TracTools(); private Ticket _ti = null; /// <summary> /// 新規作成 /// テキストボックス等をクリアする /// </summary> /// <param name="sender"></param> /// <param name="e"></param> private void buttonNew_Click(object sender, EventArgs e) { textBoxID.Text = ""; textBoxID.Enabled = true; textBoxSummary.Text = ""; textBoxRepoter.Text = _Repoter; textBoxOwner.Text = "someone"; textBoxDescription.Text = ""; textBoxAction.Text = ""; textBoxActionValue.Text = ""; _ti = null; } /// <summary> /// 指定IDのチケットを読み込む /// </summary> /// <param name="sender"></param> /// <param name="e"></param> private void buttonGet_Click(object sender, EventArgs e) { if (textBoxID.Text == "") return; int id = int.Parse(textBoxID.Text); Ticket ti = _trac.TicketGet(id); textBoxID.Enabled = false; textBoxSummary.Text = ti.Summary; textBoxRepoter.Text = ti.Reporter; textBoxOwner.Text = ti.Owner; textBoxDescription.Text = ti.Description; _ti = ti; } /// <summary> /// チケットを書き込む /// IDが空白の場合は、新規登録。 /// IDが空白でない場合は、更新登録。 /// </summary> /// <param name="sender"></param> /// <param name="e"></param> private void buttonPost_Click(object sender, EventArgs e) { if (textBoxID.Text == "") { // 新規登録 Ticket ti = new Ticket(); ti.Summary = textBoxSummary.Text; ti.Description = textBoxDescription.Text; ti.Reporter = textBoxRepoter.Text; ti.Owner = textBoxOwner.Text; int id = _trac.TicketCreate(ti); textBoxID.Text = id.ToString(); _ti = ti; textBoxID.Enabled = false; } else { // 更新登録 int id = int.Parse(textBoxID.Text); Ticket ti = _ti; ti.Description = textBoxDescription.Text; ti.Owner = textBoxOwner.Text; _ti = _trac.TicketUpdate(ti); textBoxID.Enabled = false; } } /// <summary> /// 指定IDのチケットを削除 /// </summary> /// <param name="sender"></param> /// <param name="e"></param> private void buttonDelete_Click(object sender, EventArgs e) { if (_ti == null) return; _trac.TicketDelete(_ti.ID); textBoxID.Text = ""; textBoxSummary.Text = ""; textBoxRepoter.Text = _Repoter; textBoxOwner.Text = "someone"; textBoxDescription.Text = ""; textBoxAction.Text = ""; textBoxActionValue.Text = ""; textBoxID.Enabled = true; _ti = null; } /// <summary> /// アクションを更新 /// </summary> /// <param name="sender"></param> /// <param name="e"></param> private void buttonAction_Click(object sender, EventArgs e) { if (_ti == null) return; string act = textBoxAction.Text; _ti = _trac.TicketUpdate(_ti, act); } }} |
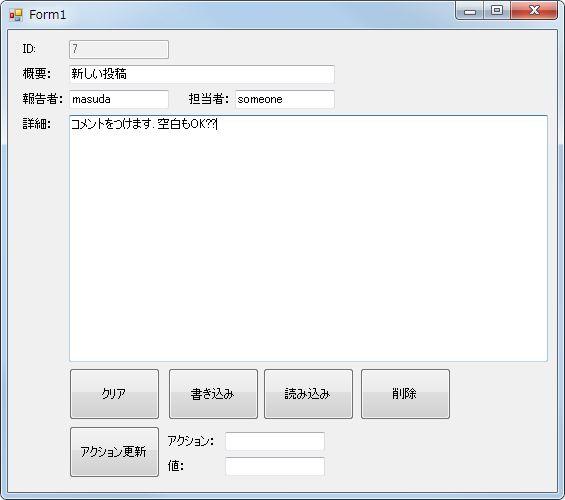
画面もチープな感じでよいので、こんな感じ。
こんな風にプロトタイプを作る場合には、
- コマンドラインツールで動作確認
- 適度にクラス分けをしておく(特に呼び出し形式に注意)
- チープな画面で windows アプリとして作る
という流れで作ります。NUnit が絡むところは、1 と 2 の間ぐらいなのですが、1 で動作確認をしていると NUnit を使わなくてもそこそこ動作ができます。いわゆるコードの品質が上がります。
windows アプリを作る 3 の段階では、既に内部の動作確認済みなので、GUI との結合だけを確認します。
そして、その後、画面をリッチにしたり、ボタンの制御(不要なときは押せないとか)の処理を入れていきます。
こういう風に組み立てていくと、不思議な動作による手戻り…というかバグ解析が減るので、結構効率があがりますよ、という話です。あと、今回の trac を xml-rpc でアクセスするような内部動作がいまいち不明な場合、try and error が必要な場合は、こんな風に手順よくやっていったほうが結果的に早く終わります。