Raspberry Pi用モータードライバボード(キット) – スイッチサイエンス
https://www.switch-science.com/catalog/1239/
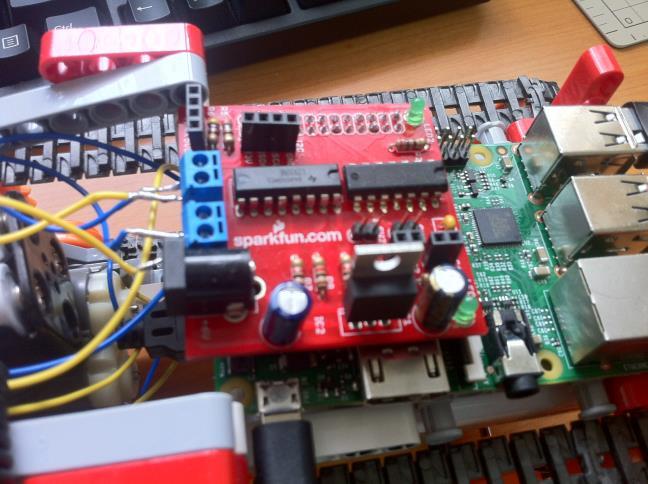
今度は、モータードライバーを使ってモーターを動かします。今回使っているのは Raspberry Pi 用のモータードライバーシールドで、4,000円弱という RasPi が買えるかもしれません、というお値段で結構します。慣れれば自作できるようなんですが、手始めにひとつ買ってためしています。ちなみに、このキットは v2 が出ていて adafrutit などから購入できます。
RasPi Robot Board v2 by MonkMakes ID: 1940 – $29.95 : Adafruit Industries, Unique & fun DIY electronics and kits
http://www.adafruit.com/product/1940
動作させるためのサンプルコードは以下にあります。
simonmonk/raspirobotboard2
https://github.com/simonmonk/raspirobotboard2
9V(乾電池6個)を給電すると、RasPi に 5V 給電してくれるので、RasPi 本体への USB 給電がいらなくなるみたいです。私の場合は、両方に 5V ずつ給電しているので、今度試してみましょう。
サンプルコードを追っていくと
– ボード上の LED1,2 を光らせる
– ボード上の SW1,2 を ON/OFF できる
– モーター1,2 を回転/逆回転できる
ことが分かります。残念ながらスピード制御はできないので、戦車のようなキャタピラ式のものとか、ギア比を変えてアームを動かすとかに使えますね。PWM制御(パルス制御)のほうは、別途回路を組んで実験していきます。
両輪のギアーボックスを使うと、右左の車輪を別々に制御できるので、車体を右左に曲げることができます。普通の車のようにハンドル+後輪駆動みたいにしたい場合は、別途サーボ制御が必要になるのですが、キャタピラ式はこれで十分だったりします。まあ、普通のラジコンカーを作るのも今後の課題ですね。
ピンを調べる
さて、ON/OFF のピンは、サンプルの python スクリプトを見ると以下のようになっています。
https://github.com/simonmonk/raspirobotboard/blob/master/raspirobotboard.py
1 2 3 4 5 6 7 8 9 10 | LEFT_GO_PIN = 17LEFT_DIR_PIN = 4RIGHT_GO_PIN = 10RIGHT_DIR_PIN = 25SW1_PIN = 11SW2_PIN = 9LED1_PIN = 7LED2_PIN = 8OC1_PIN = 22OC2_PIN = 21 |
RasPi 専用のシールドなので、GPIO のピンは RasPi に合わせてあるわけですが、この GPIO の番号と Arduino のそれとを合わせてやれば、Arduino でも使うことができると思います。まあ、Arduino 専用のものを買ったほうが早かったり、自作したほうがいい気もしますが。
C# で使えるように書き直す
後で整理して git にアップしますが、python のコードを C# に書き直したのが次のものです。
内部的に
AlexSartori/RaspberryGPIOManager
https://github.com/AlexSartori/RaspberryGPIOManager
をちょっと改変して使っています。
1 2 3 4 5 6 7 8 9 10 11 12 13 14 15 16 17 18 19 20 21 22 23 24 25 26 27 28 29 30 31 32 33 34 35 36 37 38 39 40 41 42 43 44 45 46 47 48 49 50 51 52 53 54 55 56 57 58 59 60 61 62 63 64 65 66 67 68 69 70 71 72 73 74 75 76 77 78 79 80 81 82 83 84 85 86 87 88 89 90 91 92 93 94 95 96 97 98 99 100 101 102 103 104 105 106 107 108 109 110 111 112 113 114 115 116 117 118 | using System;using System.Collections.Generic;using System.Linq;using System.Text;using System.Threading.Tasks;using RaspberryGPIOManager;using System.Threading;namespace RaspiRobotNet{ public class RaspiRobot { const int LEFT_GO_PIN = 17; const int LEFT_DIR_PIN = 4; const int RIGHT_GO_PIN = 10; const int RIGHT_DIR_PIN = 25; const int SW1_PIN = 11; const int SW2_PIN = 9; const int LED1_PIN = 7; const int LED2_PIN = 8; const int OC1_PIN = 22; const int OC2_PIN = 21; public GPIOPinDriver LED1 { get; set; } public GPIOPinDriver LED2 { get; set; } public GPIOPinDriver OC1 { get; set; } public GPIOPinDriver OC2 { get; set; } public GPIOPinDriver LEFT_GO { get; set; } public GPIOPinDriver LEFT_DIR { get; set; } public GPIOPinDriver RIGHT_GO { get; set; } public GPIOPinDriver RIGHT_DIR { get; set; } public RaspiRobot() { this.LED1 = new GPIOPinDriver(GPIOPinDriver.Pin.GPIO7, GPIOPinDriver.GPIODirection.Out, GPIOPinDriver.GPIOState.Low); this.LED2 = new GPIOPinDriver(GPIOPinDriver.Pin.GPIO8, GPIOPinDriver.GPIODirection.Out, GPIOPinDriver.GPIOState.Low); this.OC1 = new GPIOPinDriver(GPIOPinDriver.Pin.GPIO22, GPIOPinDriver.GPIODirection.Out, GPIOPinDriver.GPIOState.Low); this.OC2 = new GPIOPinDriver(GPIOPinDriver.Pin.GPIO21, GPIOPinDriver.GPIODirection.Out, GPIOPinDriver.GPIOState.Low); this.LEFT_GO = new GPIOPinDriver(GPIOPinDriver.Pin.GPIO17, GPIOPinDriver.GPIODirection.Out, GPIOPinDriver.GPIOState.Low); this.LEFT_DIR = new GPIOPinDriver(GPIOPinDriver.Pin.GPIO4, GPIOPinDriver.GPIODirection.Out, GPIOPinDriver.GPIOState.Low); this.RIGHT_GO = new GPIOPinDriver(GPIOPinDriver.Pin.GPIO10, GPIOPinDriver.GPIODirection.Out, GPIOPinDriver.GPIOState.Low); this.RIGHT_DIR = new GPIOPinDriver(GPIOPinDriver.Pin.GPIO25, GPIOPinDriver.GPIODirection.Out, GPIOPinDriver.GPIOState.Low); } public void SetMotors( int left_go, int left_dir, int right_go, int right_dir ) { this.SetMotors(left_go != 0, left_dir != 0, right_go != 0, right_dir != 0); } public void SetMotors( bool left_go, bool left_dir, bool right_go, bool right_dir ) { this.LEFT_GO.State = left_go ? GPIOPinDriver.GPIOState.High : GPIOPinDriver.GPIOState.Low; this.LEFT_DIR.State = left_dir ? GPIOPinDriver.GPIOState.High : GPIOPinDriver.GPIOState.Low; this.RIGHT_GO.State = right_go ? GPIOPinDriver.GPIOState.High : GPIOPinDriver.GPIOState.Low; this.RIGHT_DIR.State = right_dir ? GPIOPinDriver.GPIOState.High : GPIOPinDriver.GPIOState.Low; } public void Stop() { this.SetMotors(false, false, false, false); } public void Forward(float sec = 0.0f) { this.SetMotors(true, false, true, false); if (sec > 0.0f) { Thread.Sleep((int)(sec * 1000.0)); this.Stop(); } } public void Left(float sec = 0.0f) { this.SetMotors(true, false, true, true); if (sec > 0.0f) { Thread.Sleep((int)(sec * 1000.0)); this.Stop(); } } public void Right(float sec = 0.0f) { this.SetMotors(true, true, true, false); if (sec > 0.0f) { Thread.Sleep((int)(sec * 1000.0)); this.Stop(); } } public void Reverse(float sec = 0.0f) { this.SetMotors(true, true, true, true); if (sec > 0.0f) { Thread.Sleep((int)(sec * 1000.0)); this.Stop(); } } public void Back(float sec = 0.0f) { this.Reverse(sec); } public void SetLED1( bool sw ) { this.LED1.State = sw ? GPIOPinDriver.GPIOState.High : GPIOPinDriver.GPIOState.Low; } public void SetLED2(bool sw) { this.LED2.State = sw ? GPIOPinDriver.GPIOState.High : GPIOPinDriver.GPIOState.Low; } public void SetOC1(bool sw) { this.OC1.State = sw ? GPIOPinDriver.GPIOState.High : GPIOPinDriver.GPIOState.Low; } public void SetOC2(bool sw) { this.OC2.State = sw ? GPIOPinDriver.GPIOState.High : GPIOPinDriver.GPIOState.Low; } }} |
でもって、F# でテストコードを書いてみます。
1 2 3 4 5 6 7 8 9 10 11 12 13 14 15 16 17 18 19 20 21 22 23 24 25 | open Systemopen RaspiRobotNetopen RaspberryGPIOManager[<EntryPoint>]let main argv = printfn "Hello RaspiRobotNet" let robot = new RaspiRobot() let mutable loop = true while loop do let key = Console.ReadKey() match key.KeyChar with | 'e' | 'q' -> loop <- false | 'f' -> robot.Forward(1.0f) | 'b' -> robot.Back(1.0f) | 'r' -> robot.Right(1.0f) | 'l' -> robot.Left(1.0f) | 's' -> robot.Stop() | '1' -> robot.SetLED1( robot.LED1.State = GPIOPinDriver.GPIOState.Low ) | '2' -> robot.SetLED2( robot.LED2.State = GPIOPinDriver.GPIOState.Low ) | '3' -> robot.SetOC1( robot.OC1.State = GPIOPinDriver.GPIOState.Low ) | '4' -> robot.SetOC2( robot.OC2.State = GPIOPinDriver.GPIOState.Low ) | _ -> () 0 // 整数の終了コードを返します |
Tera Term で接続して、WiFi 経由で制御ができます。
F# のインストールは、以下を参考にしてください。
Raspberry Pi 2 に F# をインストールする | Moonmile Solutions Blog
http://www.moonmile.net/blog/archives/6870
これで、モータードライバーの制御は作れたので、これをゲームコントローラーで制御できるようにしていきます。