[C#] WPFのThumbコントロールを使ってドラッグを実装する | Moonmile Solutions Blog
http://www.moonmile.net/blog/archives/3701
どうせなので続きをちょっと書いておきます。
Thumb コントロールを使うと、コントロールのドラッグが簡単にできるようになったのですが、汎用的に使うにしては色々な処理をいれないと駄目なのが難点です。特にドラッグに必要な、
- DragStarted
- DragCompleted
- DragDelta
の3つを実装する必要があるのです。なので、これをユーザーコントロールでくるんでしまいます。ユーザコントロールは UserControl を継承していますが、直接 Thumb コントロールを継承するように変更します。
1 2 3 4 5 6 7 8 9 10 11 12 13 14 15 16 17 | <Thumb x:Class="SampleWpfDragBitmap.ThumbDrag" xmlns="http://schemas.microsoft.com/winfx/2006/xaml/presentation" xmlns:x="http://schemas.microsoft.com/winfx/2006/xaml" xmlns:mc="http://schemas.openxmlformats.org/markup-compatibility/2006" xmlns:d="http://schemas.microsoft.com/expression/blend/2008" mc:Ignorable="d" d:DesignHeight="50" d:DesignWidth="50" DragCompleted="mark_DragCompleted" DragStarted="mark_DragStarted" DragDelta="mark_DragDelta" > <Thumb.Template> <ControlTemplate TargetType="Thumb"> <Ellipse Fill="{TemplateBinding Background}" Width="50" Height="50"/> </ControlTemplate> </Thumb.Template></Thumb> |
内部のテンプレート記述はそのままです。ルートとなるタグが「Thumb」に変えるのがミソですね。
あと、このコントロールを使う方から背景画像(Background)を指定できるように、TemplateBinding を指定しておきます。これで Thumb コントロールには Background プロパティがないのですが、この ThumbDrag コントロールでは背景を指定できるようになります。
1 2 3 4 5 6 7 8 9 10 11 12 13 14 15 16 17 18 19 20 21 22 | /// <summary>/// ThumbDrag.xaml の相互作用ロジック/// </summary>public partial class ThumbDrag : System.Windows.Controls.Primitives.Thumb{ public ThumbDrag() { InitializeComponent(); } private void mark_DragCompleted(object sender, System.Windows.Controls.Primitives.DragCompletedEventArgs e) { } private void mark_DragStarted(object sender, System.Windows.Controls.Primitives.DragStartedEventArgs e) { } private void mark_DragDelta(object sender, System.Windows.Controls.Primitives.DragDeltaEventArgs e) { Canvas.SetLeft(this, Canvas.GetLeft(this) + e.HorizontalChange); Canvas.SetTop(this, Canvas.GetTop(this) + e.VerticalChange); }} |
ユーザーコントロールのほうで実装するのは、DragDelta イベントだけです。
1 2 3 4 5 6 7 8 9 10 | <Window x:Class="SampleWpfDragBitmap.MainWindow" xmlns="http://schemas.microsoft.com/winfx/2006/xaml/presentation" xmlns:x="http://schemas.microsoft.com/winfx/2006/xaml" Title="MainWindow" Height="350" Width="525" xmlns:my="clr-namespace:SampleWpfDragBitmap"> <Canvas > <my:ThumbDrag Canvas.Left="32" Canvas.Top="36" Height="58" x:Name="thumbDrag1" Width="56" BorderThickness="2" BorderBrush="green" Background="#FFB72323" /> <Button Canvas.Left="428" Canvas.Top="0" Content="Color" Height="23" Name="button1" Width="75" Click="button1_Click" /> <Button Canvas.Left="428" Canvas.Top="40" Content="Bitmap" Height="23" Name="button2" Width="75" Click="button2_Click" /> </Canvas></Window> |
この ThumbDrag コントロールを使う場合は、上記のように my:ThumbDrag とします。一度コンパイルして、ツールバーからドロップすれば自動で作られます。

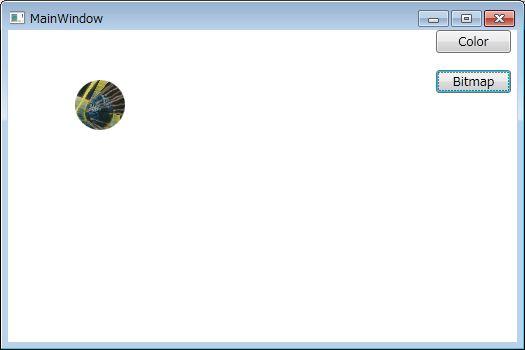
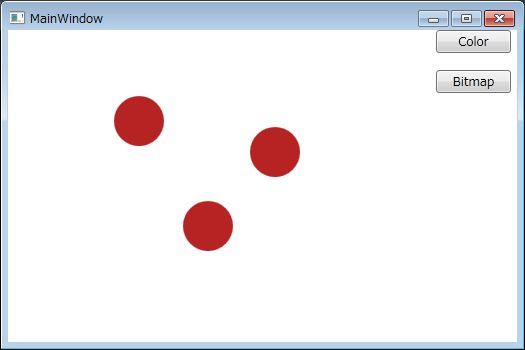
ボタンを2つ付けておいて、背景の色を変えるテストと、背景にビットマップを貼りつけるテストをいれています。
1 2 3 4 5 6 7 8 9 10 11 12 13 14 15 16 17 18 19 | public partial class MainWindow : Window{ public MainWindow() { InitializeComponent(); } private void button1_Click(object sender, RoutedEventArgs e) { this.thumbDrag1.Background = Brushes.Green; } private void button2_Click(object sender, RoutedEventArgs e) { var bmp = new BitmapImage(new Uri("images/snap.png",UriKind.Relative)); var br = new ImageBrush(bmp); this.thumbDrag1.Background = br; }} |
こんな風に、Background プロパティに Brush を指定すれば良いのです。背景画像の場合には、ImageBrush を作成して設定します。
こうやって、コントロールにしておくと複数コピーするのが簡単なんですよね。これは、XAML のコードを3つコピーしたものです。
さて、これを動的に増やしたり減らしたりする場合はどうするかというと…まじめに VisualTreeHelper を使ってもよいのですが、数がさほど多くないのであれば、あらかじめ XAML 上で固定で追加しおいて見えないようにしておく、というのがコード的に楽ですね。「最大値」は決まってしまいますが、業務アプリの場合はこれで十分かと。